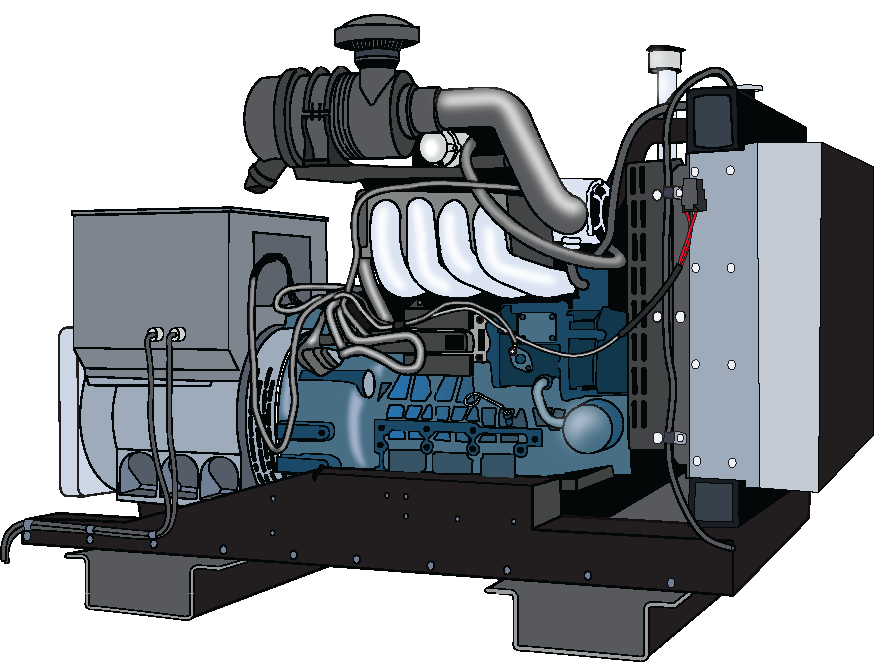
Genset
| This genset runs on propane, but the design is based on an industrial diesel-based engine; making it just as compatible, reliable, and durable to it’s diesel counterpart. Meets the strict emissions regulations of EPA Tier 2 / CARB Tier 3 and EU Stage V. |
|
| Features: Based on industrial diesel engine platform; similar performance to turbo diesel. Low Vibration Electronic Fuel Injection Throttle Control — electronic drive-by wire 3-Way Catalytic Converter. Gear drive Valve Train — no belts or chains Diagnostic Port Wire Harness / ECU Factory Installed Hot Tested at Factory Full CAN Capabilities (SAE J1939) |
|
 |
SAFETY PRECAUTIONS Careful operation is your best assurance against an accident. Read and understand this section carefully before operating the genset. All operators, no matter how much experience they may have, should read this and other related manuals before operating the Hybrid Cube or Cabinet or any equipment attached to it. It is the owner’s obligation to provide all operators with this information and instruct them on safe operation. |
 |
|
 |
|
Be sure to observe the following for safe operation Observe Safety Instructions |
Check Before Starting & Operating the Genset Be sure to inspect the genset before operation. Do not operate the genset if there is something wrong with it. Repair it immediately. Ensure all guards and shields are in place before operating the genset. Replace any that are damaged or missing. Check to see that you and others are a safe distance from the genset before starting. Always keep the genset at least 3 feet (1 meter) away from buildings and other facilities. DO NOT allow children or livestock to approach the machine while the genset is running. DO NOT start the engine by shorting across starter terminals. |
| Wear Safe Clothing & Personal Protective Equipment (PPE) DO NOT wear loose, torn or bulky clothing around the machine that may catch on working controls and projections or into fans, pulleys and other moving parts causing personal injury. Use additional safety items-PPE, e.g. hard hat, safety protection, safety goggles, gloves, etc., as appropriate or required. DO NOT operate the machine or any equipment attached to it while under the influence of alcohol, medication, or other drugs, or while fatigued. DO NOT wear radio or music headphones while operating the genset. |
|
| Keep the Engine & Surroundings Clean Be sure to stop the genset before cleaning. Keep the genset clean and free of accumulated dirt, grease and trash to avoid a fire. Store flammable fluids in proper containers and cabinets away from sparks and heat. Check for and repair leaks immediately. DO NOT stop the engine without idling; Allow the engine to cool down, first. Keep the engine idling for about 5 minutes before stopping unless there is a safety problem that requires immediate shut down. |
|
| Safe Handling of Fuel & Lubricants - Keep Away From Fire Always stop the engine before refueling and/or lubricating. DO NOT smoke or allow flames or sparks in your work area. Fuel is extremely flammable and explosive under certain conditions. Refuel at a well ventilated and open place. When fuel and/or lubricants are spilled, refuel after letting the engine cool down. Do not use unapproved containers e.g. buckets, bottles, jars. Use approved fuel storage containers and dispensers. Use the standard LPG fuel recommended by HCI Energy. The use of other fuel may cause a hazardous or dangerous condition. LPG fuel in the gaseous state is heavier than air and will settle in low areas, this may be hazardous. Please follow all operator’s manual instructions when changing the fuel tank and servicing the fuel system. |
|
| Escaping Fluid Relieve all pressure in the air, the oil and the cooling systems before disconnecting any lines, fittings or related items. Be cautious of possible pressure relief when disconnecting any device from a pressurized system that utilizes pressure. DO NOT check for pressure leaks with your hand. High pressure oil or fuel can cause personal injury. Escaping fluid under pressure has sufficient force to penetrate skin causing serious personal injury. Fluid escaping from pinholes may be invisible. Use a piece of cardboard or wood to search for suspected leaks: do not use hands and body. Use safety goggles or other eye protection when checking for leaks. If injured by escaping fluid, see a medical doctor immediately. This fluid can produce gangrene or severe allergic reaction. |
|
| Exhaust Gases & Fire Prevention Engine exhaust fumes can be very harmful if allowed to accumulate. Be sure to run the engine in a well ventilated location and where there are no people or livestock near the engine. The exhaust gas from the muffler is very hot. To prevent a fire, do not expose dry grass, mowed grass, oil or any other combustible materials to exhaust gas. Keep the genset and muffler clean at all times. To avoid a fire, be alert for leaks of flammable substances from hoses and lines. Be sure to check for leaks from hoses or pipes, such as fuel and hydraulic fluid by following the maintenance check list. To avoid a fire, do not short across power cables and wires. Check to see that all power cables and wirings are in good condition. Keep all electrical connections clean. Bare wire or frayed insulation can cause a dangerous electrical shock and personal injury. |
|
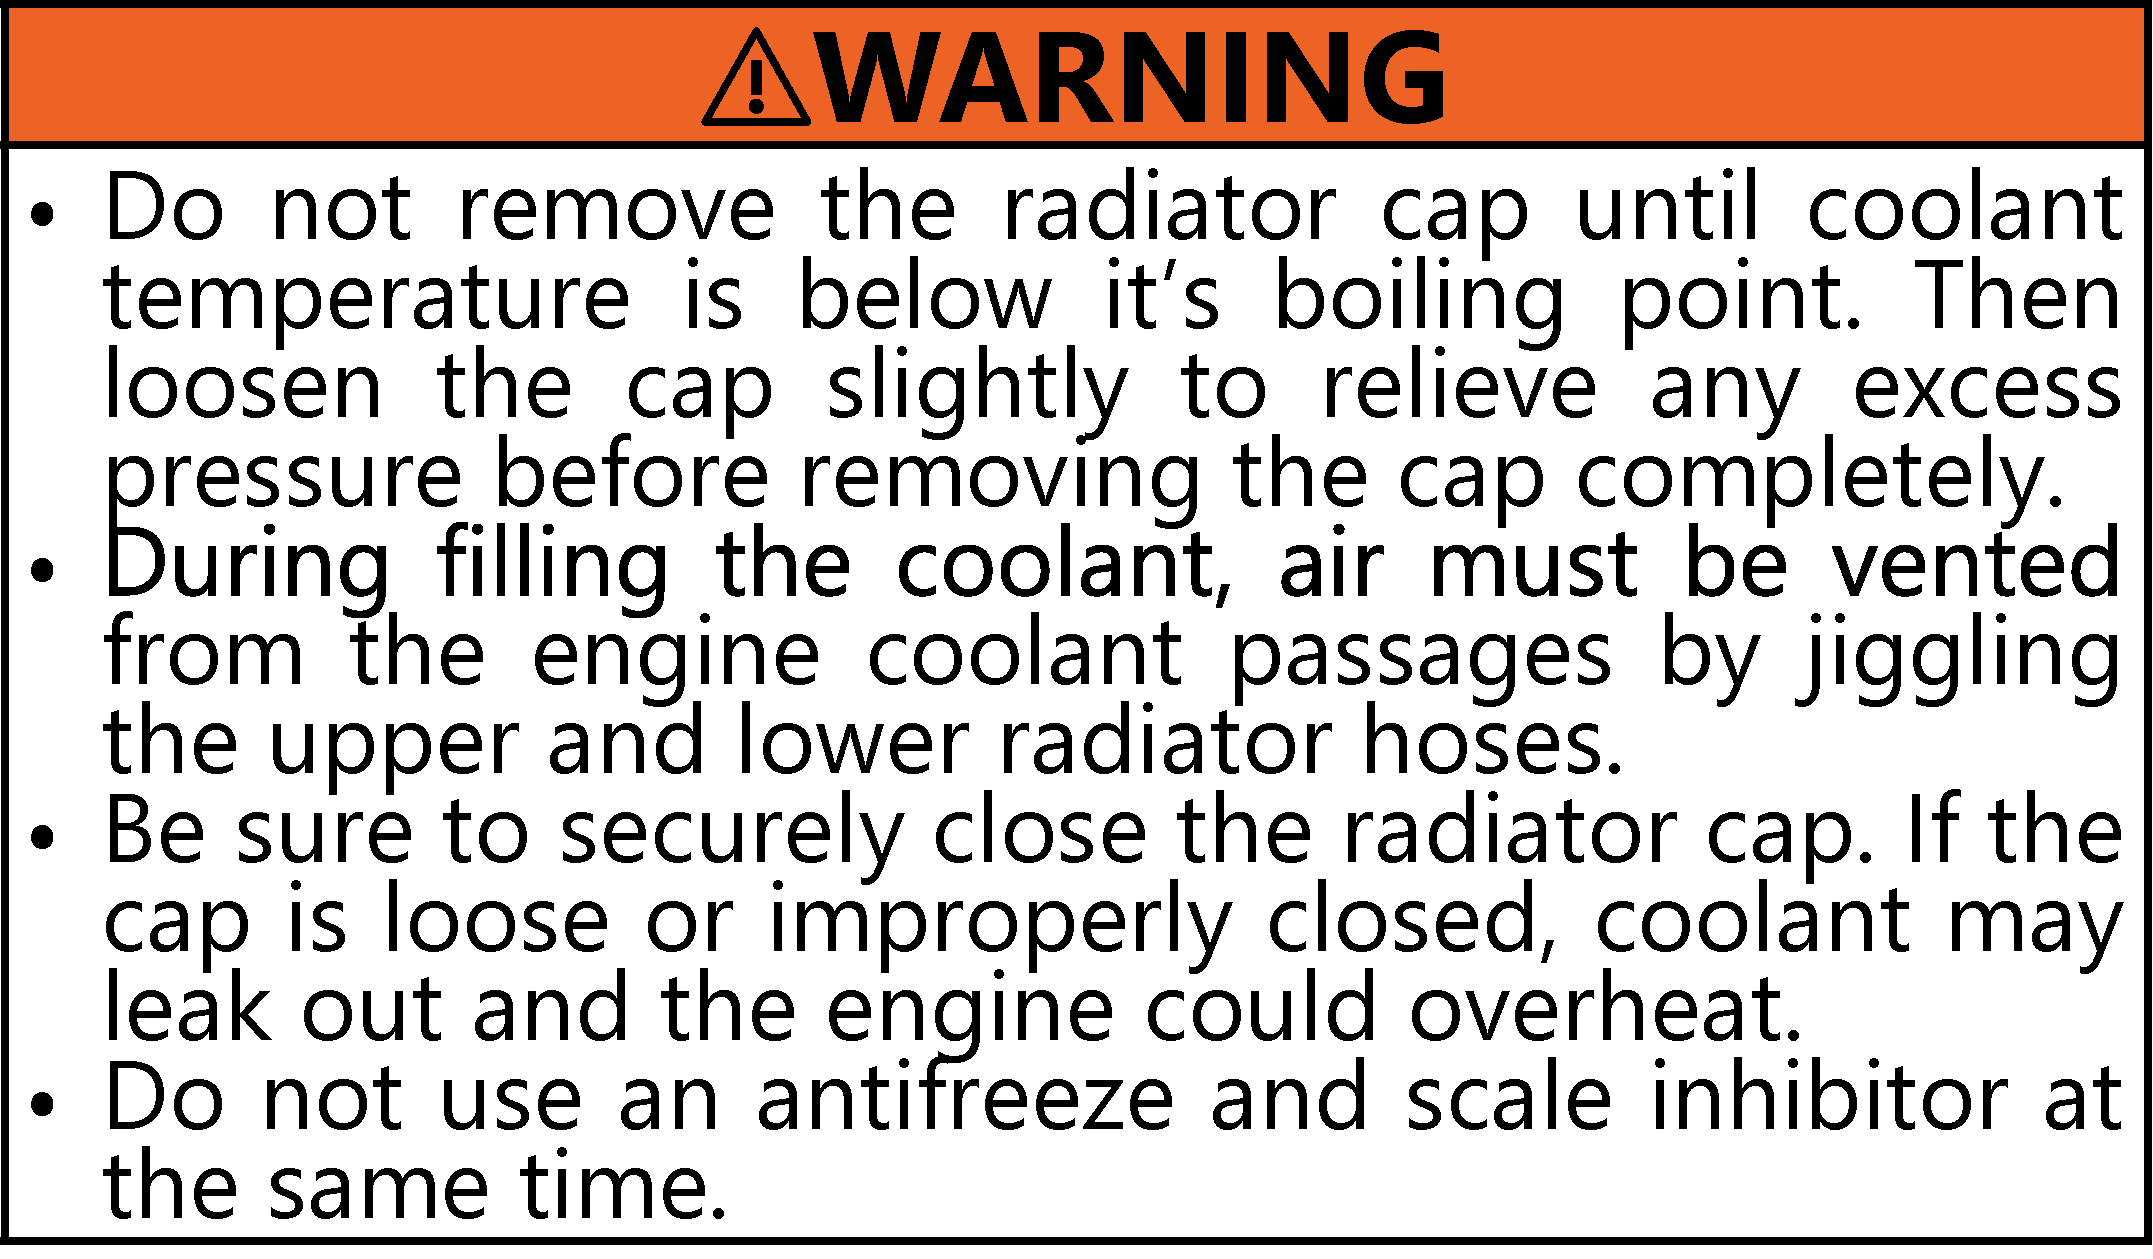
| Cautions Against Burns & Battery Explosion To avoid burns, be cautious of hot components, e.g. muffler, muffler cover, radiator, hoses, engine body, coolants, engine oil, etc. during operation and after the genset has been shut off. DO NOT remove the radiator cap while the genset is running or immediately after stopping. Otherwise hot water will spout out from the radiator. Wait until the radiator is completely cool to the touch before removing the cap. Wear safety goggles. Be sure to close the coolant drain valve, secure the pressure cap, and fasten the pipe band before operating. If these parts are taken off, or loosened, it will result in serious personal injury. The battery presents an explosive hazard. When the battery is being charged, hydrogen and oxygen gases are extremely explosive. DO NOT use or charge the battery if its fluid level is below the LOWER mark. Otherwise, the component parts may deteriorate earlier than expected, which may shorten the service life or cause an explosion. Immediately, add distilled water until the fluid level is between the UPPER and LOWER marks. Keep sparks and open flames away from the battery, especially during charging. DO NOT strike a match near the battery. DO NOT check the battery charge by placing a metal object across the terminals. Use a voltmeter or hydrometer. DO NOT charge a frozen battery. There is a risk of explosion. When frozen, warm the battery up to at least 61oF (16oC). |
|
| Keep Hands & Body Away From Rotating Parts Be sure to stop the genset before checking or adjusting the belt tension and cooling fan. Keep your hands and body away from rotating parts, such as the cooling fan, V-belt, fan drive pulley or flywheel. Contact with rotating parts can cause severe personal injury. DO NOT run the genset without safety guards. Install safety guards securely before operation. |
|
 |
|
 |
EPA and CARB emission regulations require the ultimate user of nonroad engines, as their obligation, to adjust the emissions by installing the appropriate genuine altitude kit. The ultimate users of the engine must comply with the regulations through the installation of the appropriate altitude compensation kit for the altitude range where the engine will be operated. |
 |
|
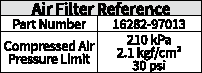
| Check every visit, clean as necessary. Replace yearly, or every 6th cleaning, whichever comes first. | |
This genset runs on propane, but the design is based on an industrial diesel-based engine; making it just as compatible, reliable, and durable to it’s diesel counterpart. Meets the strict emissions regulations of EPA Tier 2 / CARB Tier 3 and EU Stage V. Clean 1. When dry dust adheres to the filter, blow compressed air from inside, turning the element. Maintain reasonable distance between the nozzle and the filter. NOTE: Secondary element should only be removed if it is being replaced. Replace Replace primary and secondary elements at the same time. 1. Remove the and clean dust cup from the air cleaner element. 2. Remove old air cleaner filter and replace with new air cleaner filter. |
 |
 |
 |
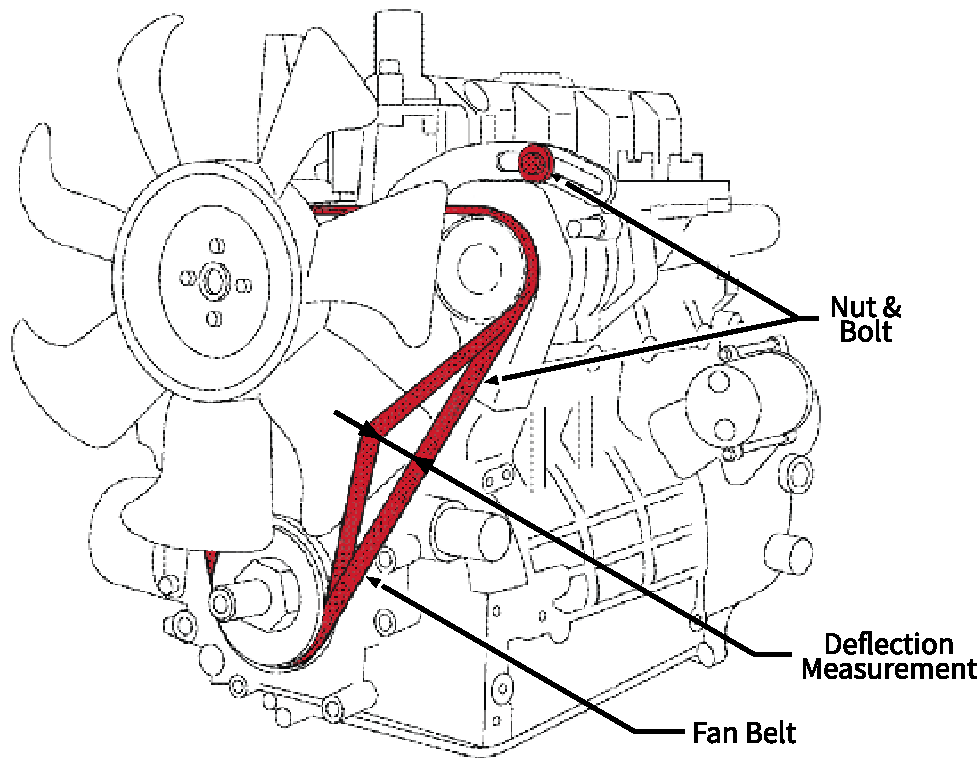
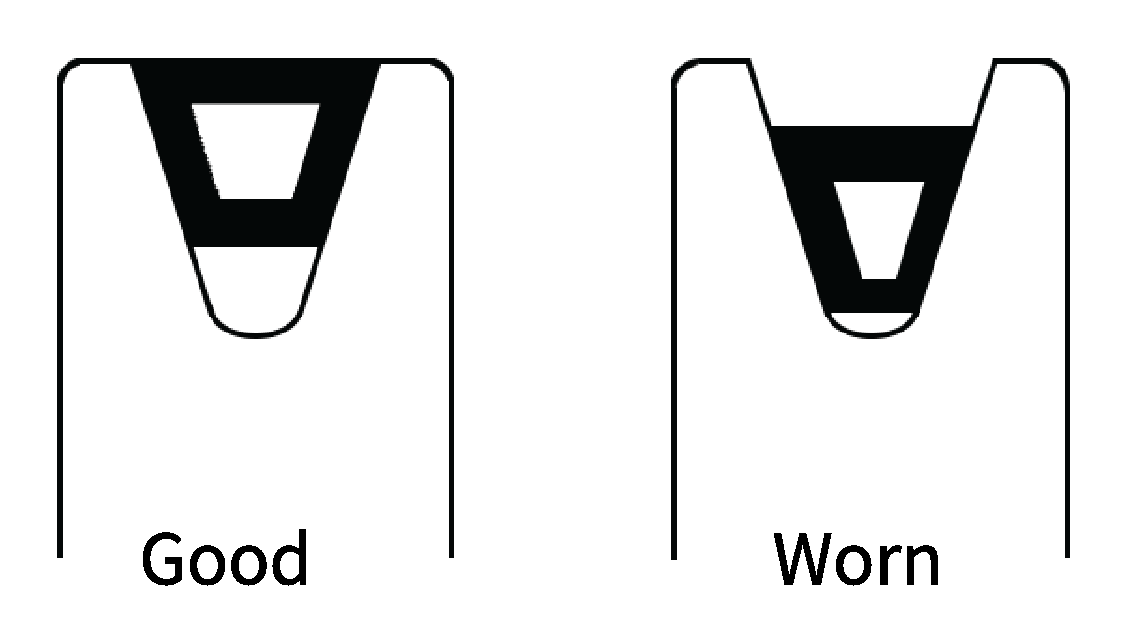
| FAN BELT Check tension every visit, adjust and replace as necessary. Check 1. Measure the deflection by depressing the belt halfway between the fan drive pulley and alternator pulley at specified force 98 N (10 kgf, 22 lbf). 2. If the tension measurement is not correct, loosen the alternator mounting screws and relocate the alternator to adjust. Replace Replace the belt if the belt is worn and sunk in the pulley grove. |
|
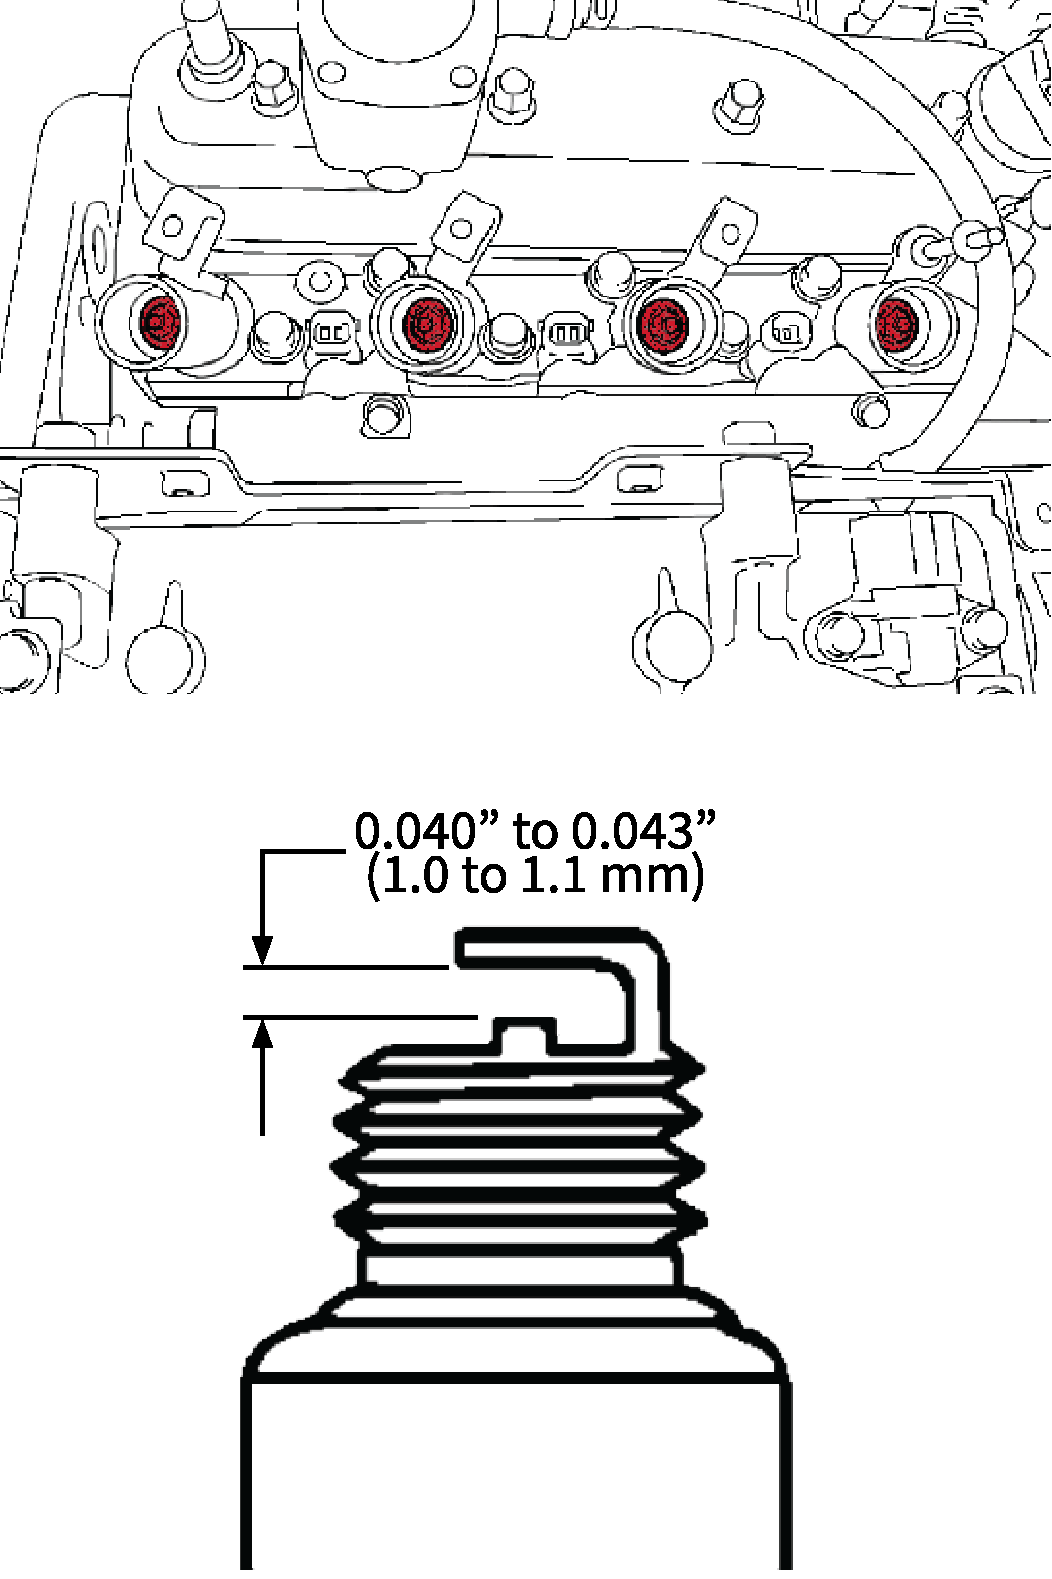
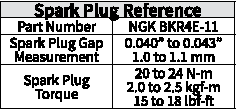
| SPARK PLUGS: Check every visit, clean and/or adjust if necessary. Replace after 2,000 hours of service. Check & Clean 1. Remove the spark plug, and remove carbon from the electrode with a wire brush or other tool. 2. Measure the spark plug gap with a feeler gauge, and adjust or replace the spark plug if the measured gap differs from the specified range — replace the spark plug if the electrode or insulator is deformed or cracked. 3. Tighten the spark plug with a plug wrench to the referenced spark plug torque. Replace 1. Disconnect the ignition coil. 2. Remove the spark plug. 3. Replace with new spark plug and tighten with a plug wrench. |
 |
 |
 |
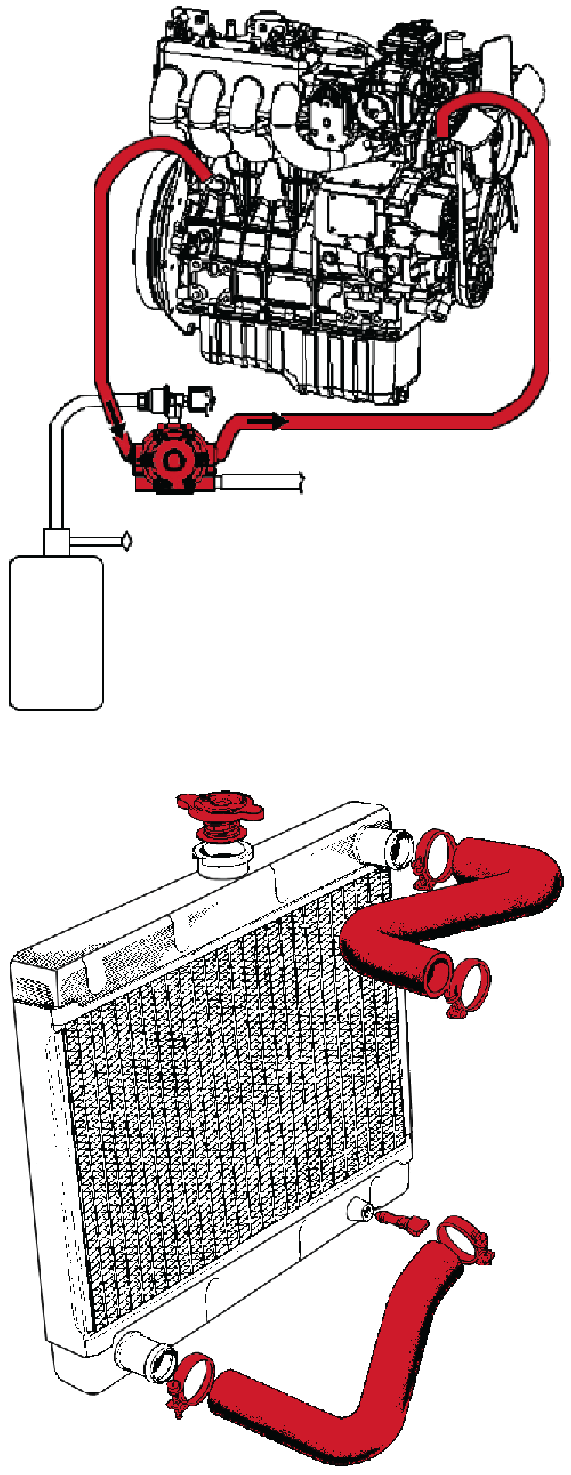
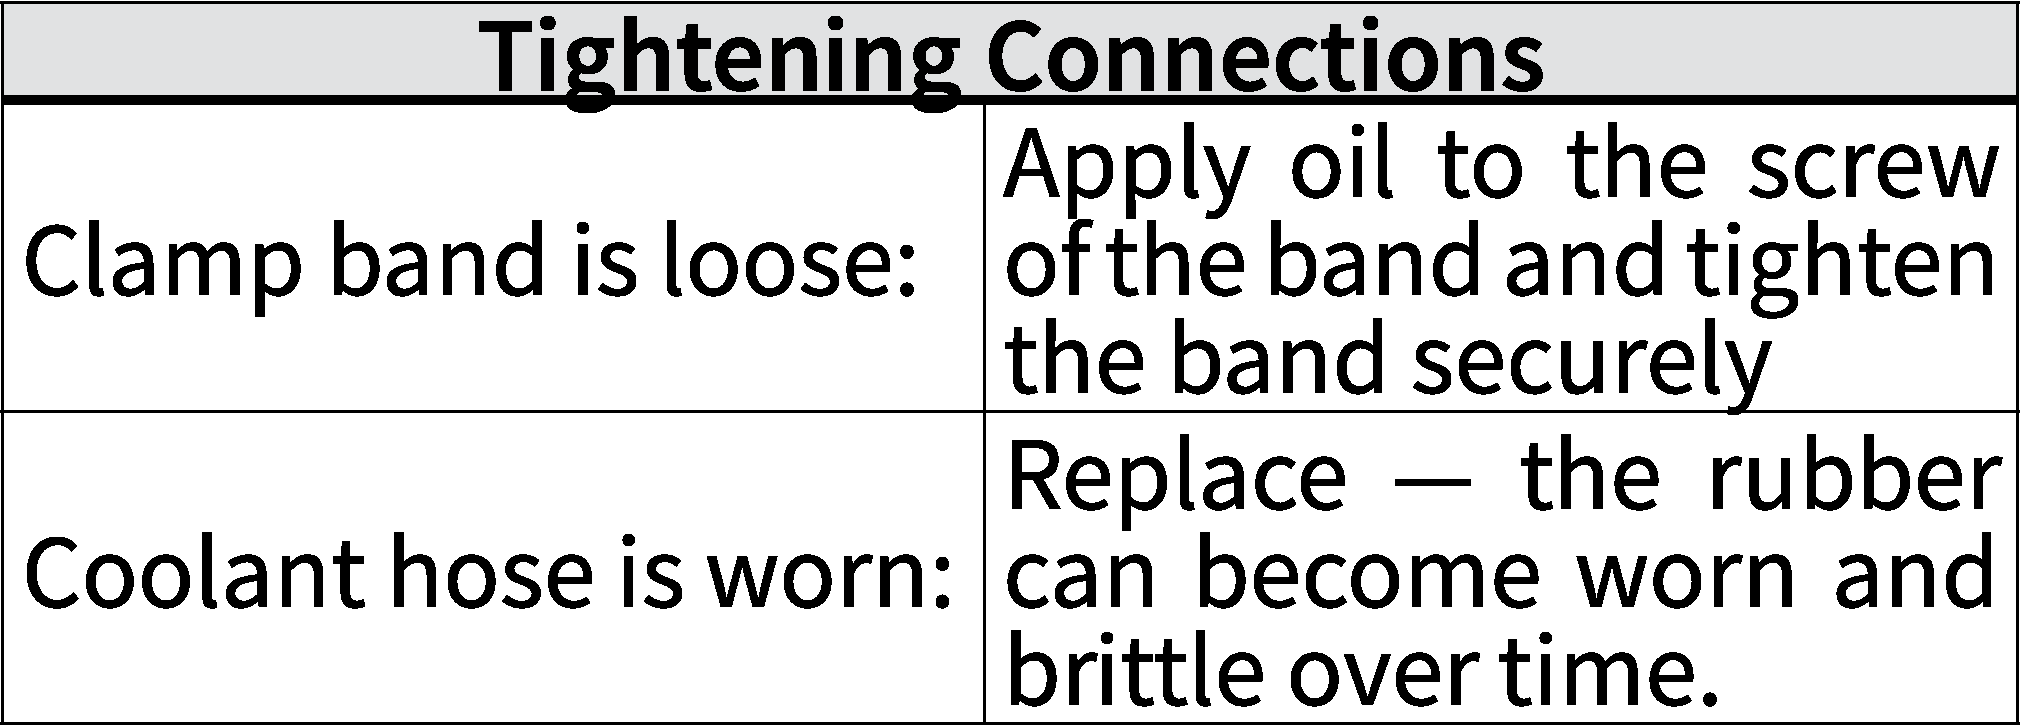
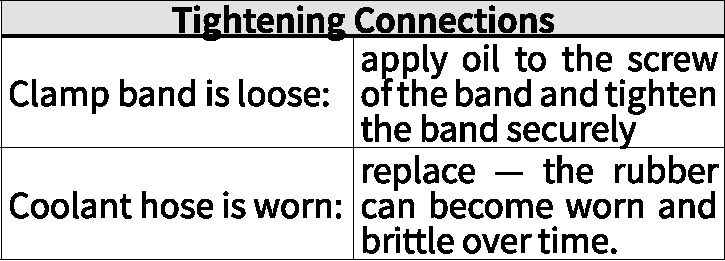
| COOLING SYSTEM Check and replace per the following schedule or sooner if necessary. Check Every Visit Coolant Level Remove the radiator cap and check to see that the coolant level is just below the port — if level is too low, check the reason for decreasing coolant. Coolant decreasing due to evaporation: fill only with fresh, soft water. Coolant decreasing by leak: fill coolant of the same manufacturer and type to the specified mixture ratio. If the coolant brand cannot be identified, drain all the remaining coolant and refill with a completely new brand of coolant mix. Hoses & Clamp Bands Ensure radiator hoses are properly fixed. Check that the hot water lines are not leaking. Semi-Annually: Vaporizer Coolant Hoses Check the coolant hoses for damage, replace if necessary. Annually: Radiator & Water Jacket If dust is between the fin and tube, wash it away with running water. NOTE: Do not clean radiator with firm tools such as spatulas or screwdrivers; they may damage the fin or tube and cause coolant leaks or decrease cooling performance. Biennially: Vaporizer Check for leaks at the inlet or outlet fittings. Make sure the mounting bracket for the vaporizer is securely mounted. |
 |
 |
 |
 |
 |
| COOLING SYSTEM: Replace • Biennially Radiator Hoses & Clamp Bands 1. Connect the new upper and lower hoses and clamps. 2. Replenish coolant to the radiator, bleed the air from the vaporizer. Coolant 1. To drain fully drain coolant, open the radiator drain plug and drain cock of the engine body, and remove the radiator cap. 2. After all coolant is drained, close the radiator drain plug and drain cock on the engine body. 3. Fill with clean water and a cooling system cleaner — follow the directions of the cooling system cleaner. 4. After flushing the cooling system cleaner, fill with clean water and anti-freeze until the coolant level is just below the port, install the radiator cap securely. 5. Start and operate the engine for a few minutes. 6. Stop the engine and let cool — check coolant level and add coolant if necessary. Anti-Freeze Always use a 50/50 mix of long-life coolant and clean soft water for the genset. Contact HCI Energy concerning coolant for extreme conditions. Long-life coolant (LLC) come in several types. use ethylene glycol (EG) for this genset. Before employing LLC-mixed cooling water, flush the radiator with fresh water — repeat this procedure two (2) or three (3) times to clean up the radiator and engine block from the inside. Mixing the LLC: Premix 50% LLC with 50% clean soft water — mix well and then add to the radiator. NOTE: This procedure differs according to the make of the anti-freeze — refer to SAE J814c. Adding the LLC: Add only water if the coolant level reduces in the cooling system by evaporation. If there is a coolant leak, add the LLC of the same manufacturer and type in the same coolant percentage. NOTE: never add any LLC of different manufacturers — different brands may have different additive components, and the engine may fail to perform as specified. When the LLC is mixed, do not employ any radiator cleaning agent. The LLC contains anti-corrosive agent. If mixed with the cleaning agent, sludge may build up, adversely affecting the engine parts. |
|
| |
|
| DEEP SEA (GENSET CONTROLLER) |  |
| The deep sea manual is separate from the operations and maintenance manual. The deep sea manual can be found under the name, "DSE7410 MKII & DSE7420 MKII". This will include all specifications, installation, operations, controls, and more. |
|
| LPG FUEL SYSTEM Check and replace per the following schedule, or sooner if necessary |
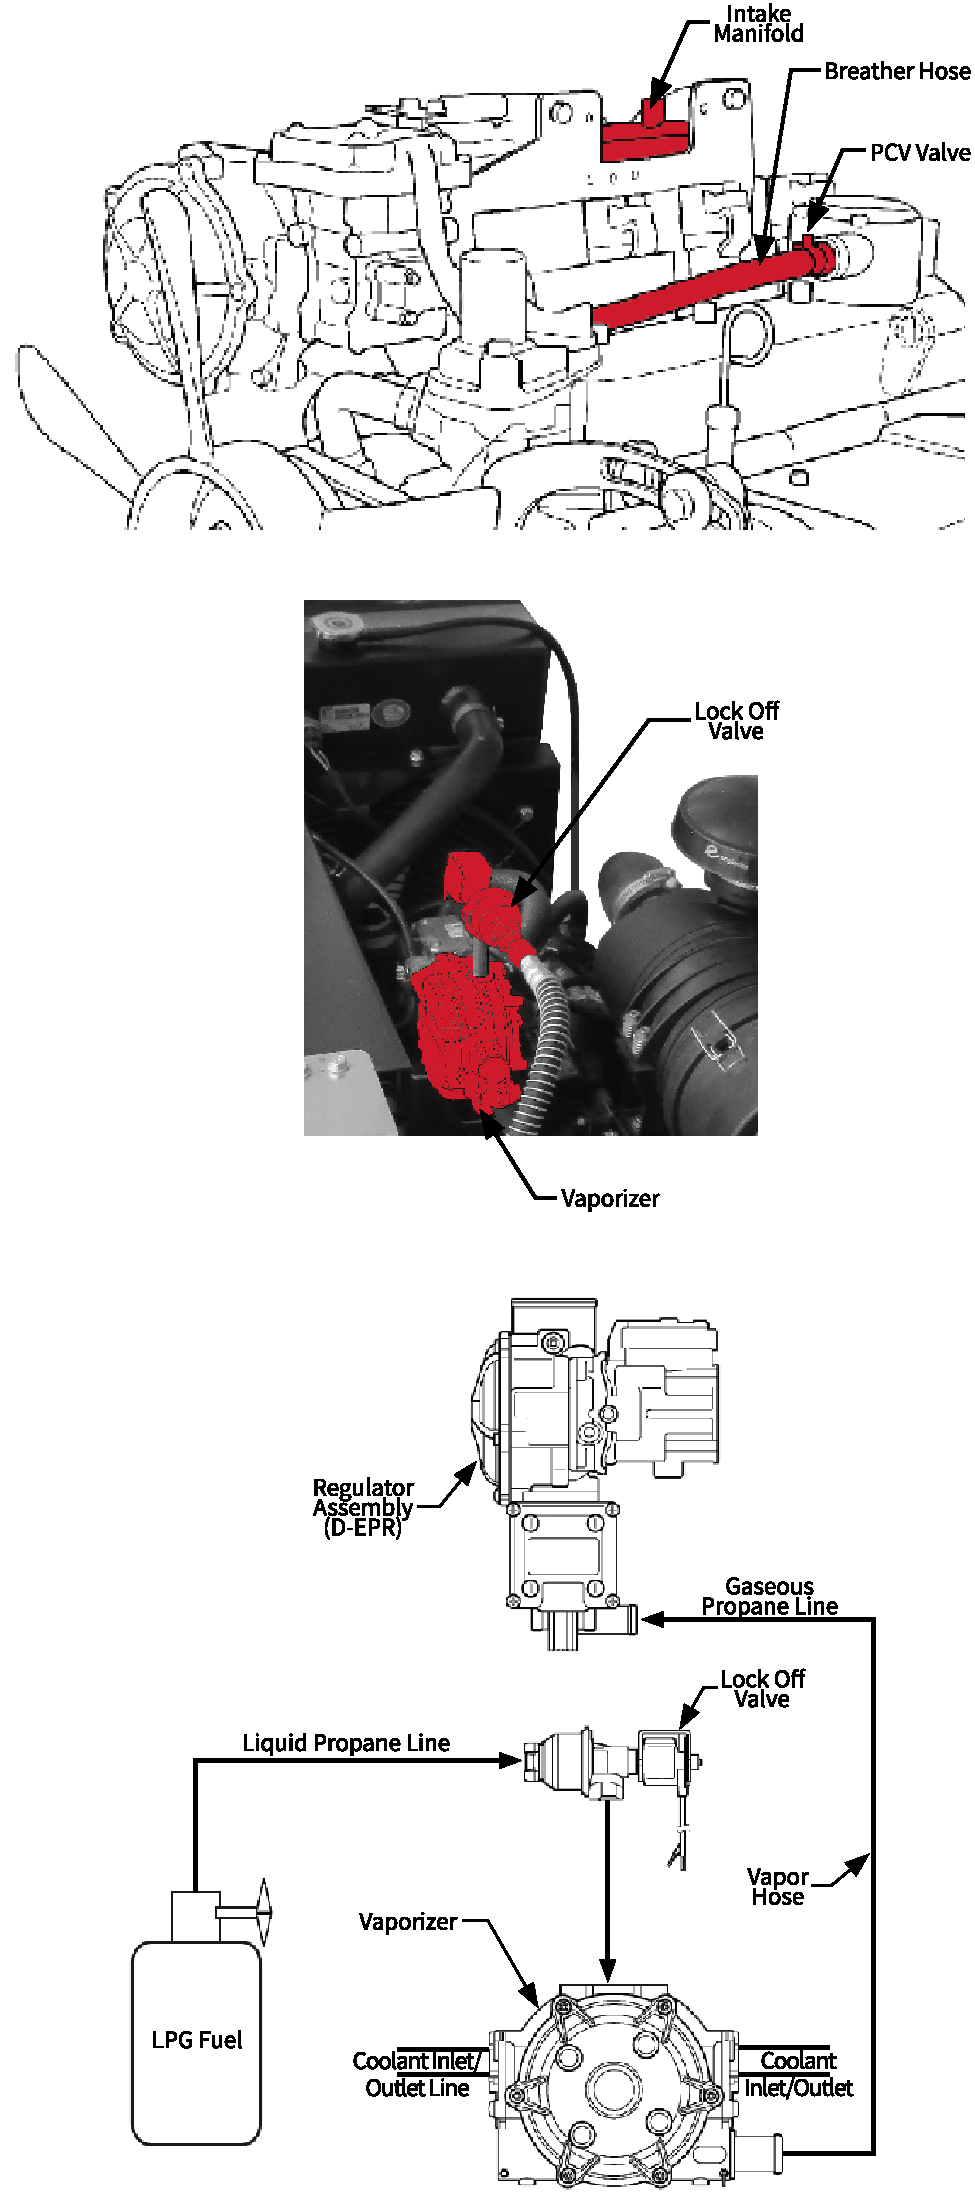 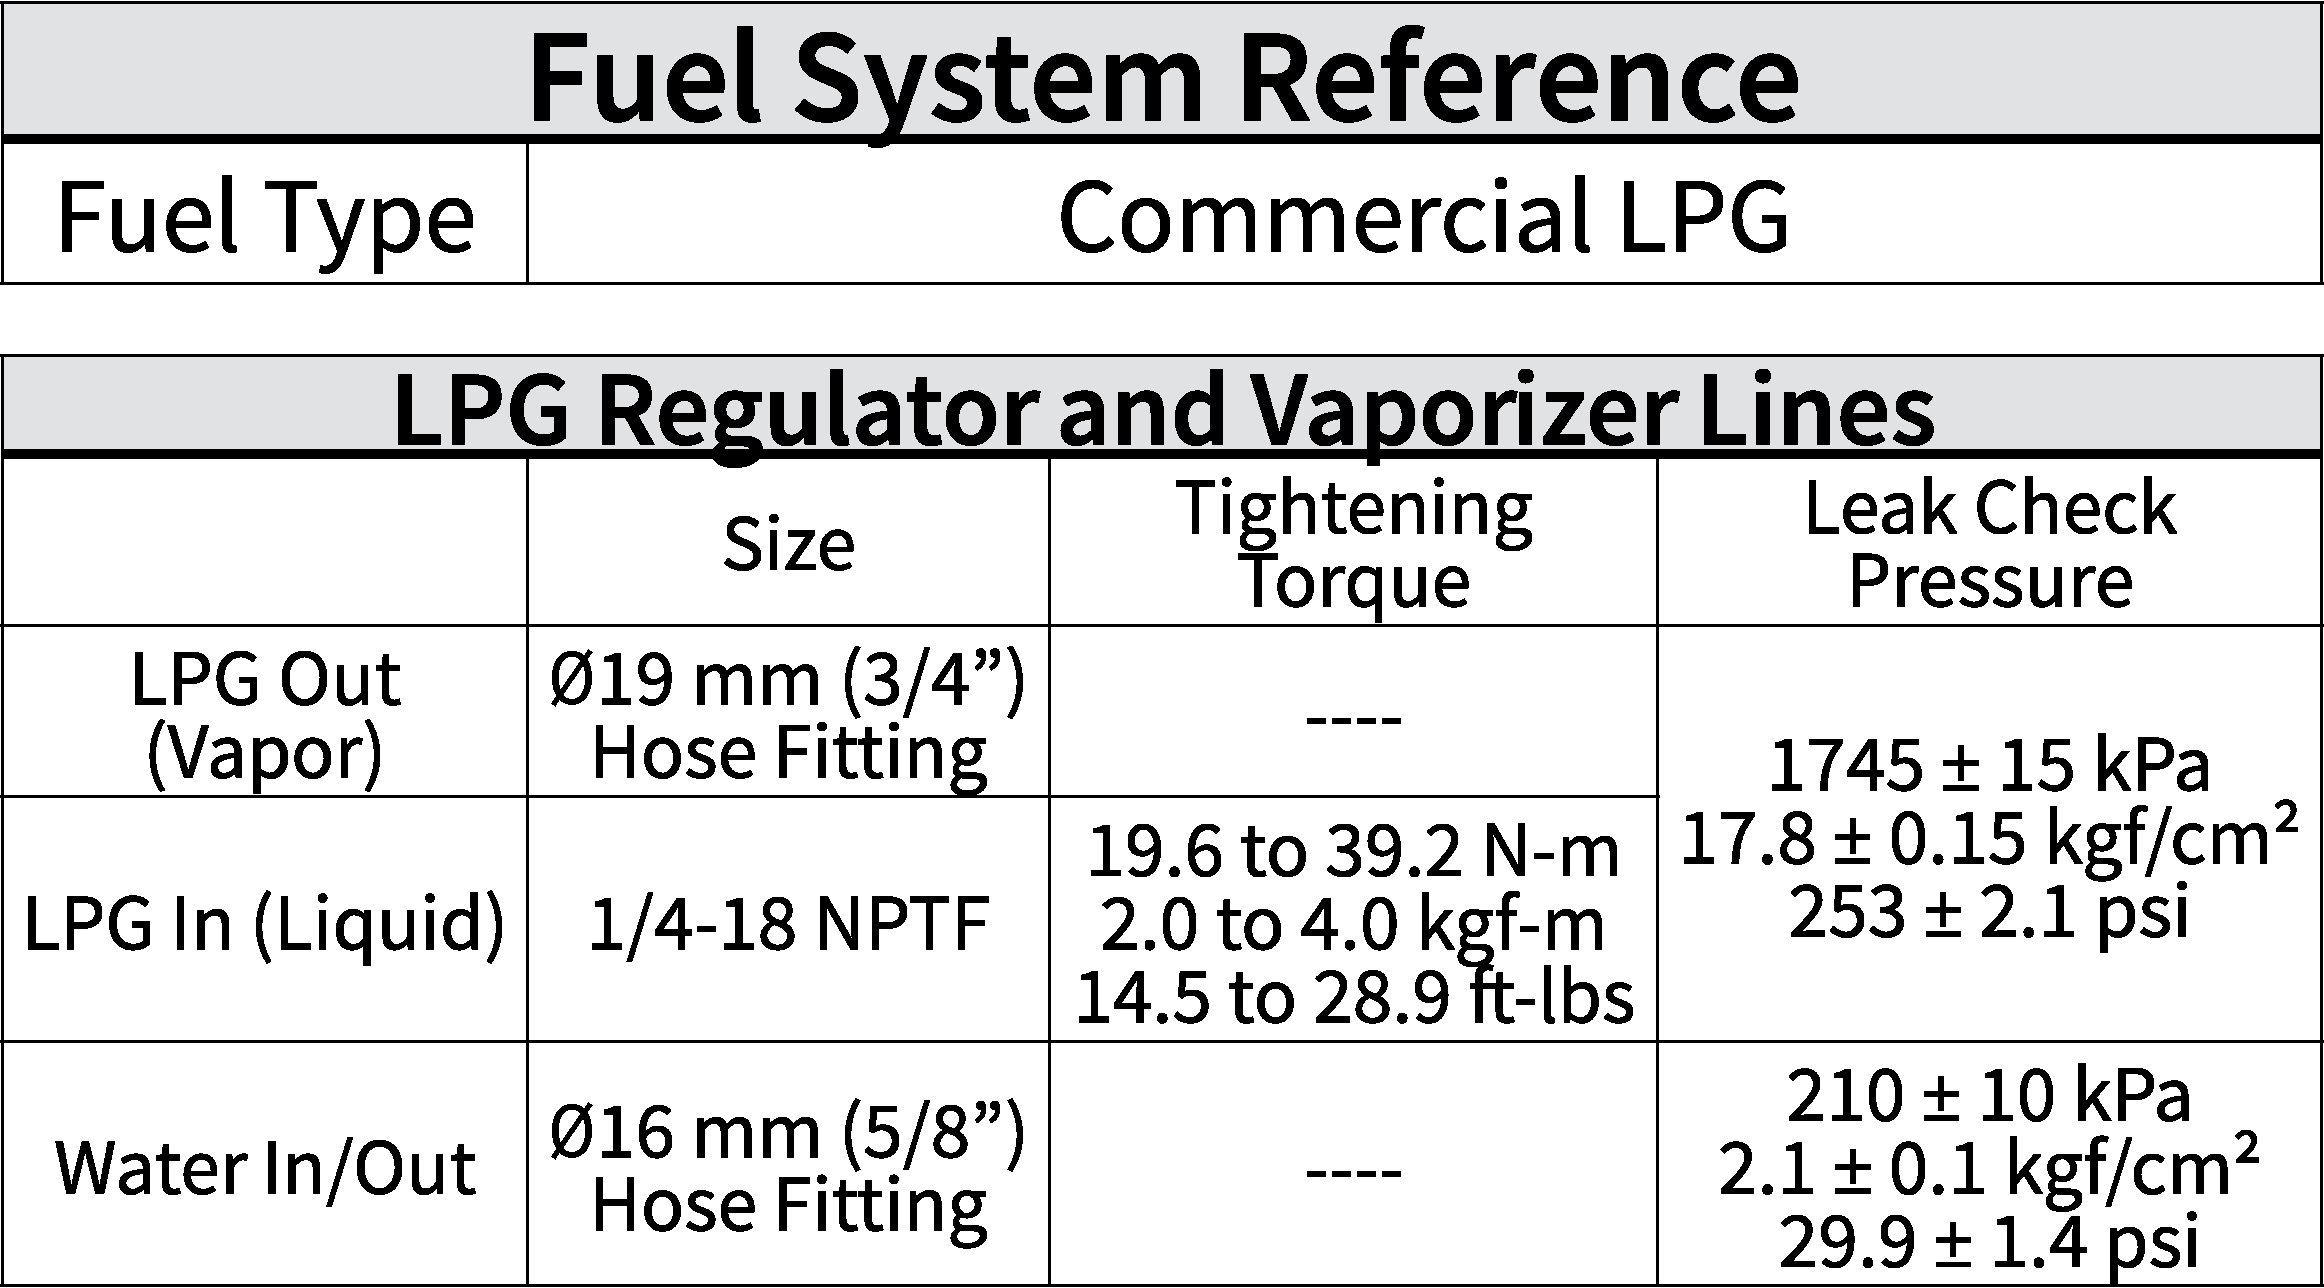 |
| Check Every Visit LPG Fuel Tank Ensure the fill up valve and liquid withdrawal valve of the LPG fuel tank can be easily opened and closed. LPG Fuel Lines, Clamps, & Connections Turn the gas on and with the engine running at a low RPM, use a soap solution to check all connections for leaks between the fuel tank and the D-EPR — bubbles will indicate a loose connection. |
|
|
Check Semi-Annually |
|
 |
 |
| BATTERY: Check every visit, recharge or replace if needed. Replace every two (2) years. Check Check the battery electrolyte level, if the level are at or below the lower level line, add distilled water to the pour level of each cell. Replace Disconnect the negative and positive terminals. Remove old battery from the battery holder. Replace with new battery. Tighten the battery holder Connect positive and negative terminals. |
 |
 |
 |
 |
|